
HubSpot is a company specialising in Inbound Marketing. Its functionalities include a CMS for managing blog or website content, digital marketing tools and a complete CRM. From the CRM you can manage the sales funnel, automate activities, store contact information and engage in conversations with leads and customers, among other options. The software hosts a database and applies a series of marketing actions depending on the stage the user is at. It is a free platform that allows you to work with an unlimited number of profiles and register up to one million registrations. In its Premium version it offers specific solutions to boost the marketing campaign.
The marketing tools offered by HubSpot allow you to increase website traffic, improve SEO positioning and boost lead conversion. Its aim is to attract users interested in the product or service and convert them into potential customers for the brand. The peculiarity of its CRM is to focus on the user experience by recording the information they leave in forms and analysing their behaviour and interaction with the brand. It also provides continuity to the sales department by tracking the visitor. It also offers downloadable resources, learning and reports on trends in the digital marketing landscape.
Create a HubSpot account
To take advantage of the platform's services, it is necessary to create an account. By doing so, you open up a range of possibilities to expand your business. Team growth is achieved by offering personalised content and working with powerful, interconnected tools. There are two main options for creating a HubSpot account:
- HubSpot account creation page: This is the most common method used by users of the platform as it only involves entering your name and email address.
.jpg?width=500&height=262&name=crear%20cuenta_page-0001%20(1).jpg)
- Alternative registration: If you wish, you can sign in from your Google account. Registration will be automatic and the two profiles will be interconnected. Another option is to sign in from your Apple ID. The ID must use two-factor authentication and you must sign in to iCloud. To use the Google email address, select Share my email. Conversely, to use the email address generated by Apple, you must select Hide my email.
After creating your account, it is important to reduce the risk of unauthorised access and secure your account. HubSpot offers several security options:
Two-factor authentication
This is the most common. When activated, it forces the user to verify their identity from a second device, usually a mobile phone. The risk of an intruder getting into your account is greatly reduced. If you lose the first device configured for 2FA and do not have a secondary device, it can be reset within 48 to 72 hours. Verification is done via SMS or external applications such as Microsoft Authenticator or Google Authenticator.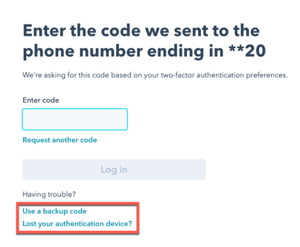 To activate this type of authentication, simply click on the ⚙ settings symbol in the navigation bar, in the left-hand side menu go to Security and then, in the Two-Factor Authentication section, click on Configure Two-Factor Authentication or 2FA.
Finally, you will receive 10 verification codes to use in case you lose your 2FA device. It is recommended that you download the codes in PDF format, the default name is backupCodes.pdf.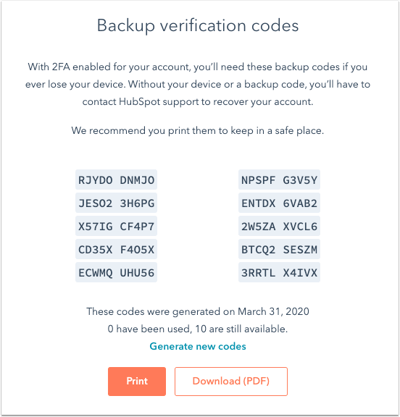
Single Sign-On
This method, also known as SSO, is the most commonly used method in enterprises. It consists of giving the team a common account for the business systems. It is advisable to have a HubSpot Enterprise account and enable the credentials.
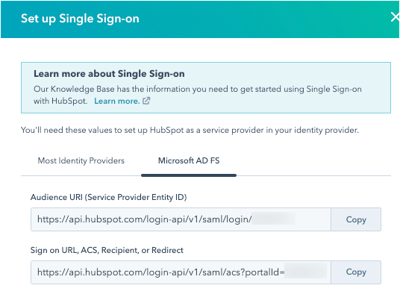
Microsoft AD SF
This login is for a HubSpot Enterprise account only. It can be configured by clicking on the ⚙ configuration icon and accessing the account defaults. These lead to the Security tab which contains the Single Sign-On Settings. Finally, click on Microsoft AD FS. The configuration is completed as follows:
- Enable a common email for all users.
- Open the Trusted Trust Relationship for Authenticated User (TTR) folder from the AD FS administrator, where you enter the data and add trust relationships.
- Activate the SAML 2.0 WebSSO support to ensure it works.
- Create assertion rules to match email to HubSpot user.
- Locate the x509 certificate in PEM format that is generated, found under Services > Certificates.
- Paste the contents of the certificate into the X.509 Certificate field, enter the SSO URL in the single sign-on field, and click Verify.
Restrict access to HubSpot employees
By default, all employees have unlimited access to the HubSpot account, so the user with Super Admin permissions must restrict permissions:
- The first step is to access the ⚙ Settings symbol from the main menu.
- After this, click on Account Defaults.
- Open the Security tab and expand the Account Access > HubSpot Employee Access checkbox.
- Click Yes in the dialog box.
why is it important to set up your HubSpot account?
Spending time setting up your HubSpot account will allow you to customise the platform for your business and ensure a good user experience. It will optimise your team's navigation of the website and learning of its free tools.
How to set up your HubSpot account in 7 steps
1. Customise your default account settings
There are individual settings that affect user preferences, but other settings apply to the entire account. These are the default settings that focus on time zone, currency or security, among others. The main factors to consider are:
- Language: HubSpot allows you to customise the language, date and number format for new users. This information can be updated whenever you wish by clicking on the ⚙ settings symbol, accessing the User Defaults and paying attention to the drop-down menu where the Language or Date and Number Format tab appears. The time zone can be selected by following the same procedure.
- Currency Type: From an Enterprise, Starter or Professional account, the currency type can be added or edited. Only the Super Administrator can perform this action by editing the Currency property from the Account Defaults tab.
- Company branding: The company domain must be connected to the web content, which can be updated and configured from the platform.
- GDPR: The Super Administrator must edit the account defaults by accessing Privacy and Consent to activate the EU General Data Protection Regulation (GDPR).
2. Add new users to your network
CRM is designed to be used as a team, to share information and to stay in constant communication between different departments. Adding users is good for:
- Avoid contacting the same user several times.
- Avoid bombarding customers with e-mails.
- Gather all the information in one place.
- Define KPIs.
To add users, you must have permissions. This is done from the ⚙ configuration symbol and the Users and teams tab. You can register a user from a CSV file or from the Salesforce platform.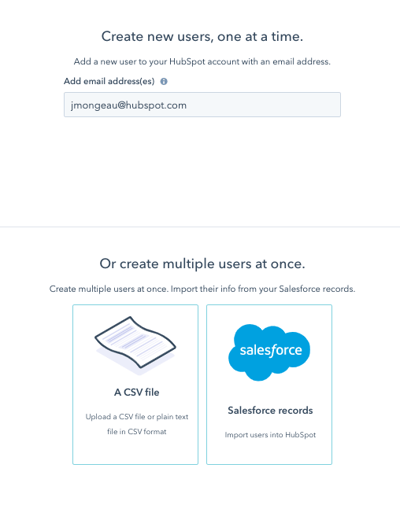 User permissions are set using the default permission set. they work through templates and there are different roles. the permission set can be customised by navigating through each of the HubSpot permission settings tabs. some of the most commonly used are:
- Super admin.
- Standard user.
- View only.
- CMS Developer.
- Marketing Manager.
Users can also access HubSpot via an email invitation. After setting permissions, the platform sends an email to new users by default to set their password.
3. Set permissions
Users with a power role can Add and edit new or existing users. From Users and Teams, you can update permissions to restrict or assign access to specific content. The following permissions are available:
- Object Access: From the drop-down menu you can restrict access to view, edit or delete an object to all, none, team only or user only.
- Tools: The checkbox allows you to grant permissions to the user to delete, view or edit the workflows tool. From the drop-down menu you can customise the user's control over communication, deletion, export or import of contacts, companies or tickets, among others.
- Marketing: The editing and publishing permissions are set for marketing department actions such as lists, forms and files.
- Marketing tools: The CRM allows you to customise permissions on ads, campaigns or emails from the Publish, Edit or View checkboxes. Similarly, you can configure participation in social networks from the drop-down menu.
- Website: The checkboxes give the user permissions on the corporate blog, website pages and landing pages. Permissions vary between Publish, Edit or View only.
4. Configure your profile and its preferences
In the ⚙ settings symbol you can customise your user by changing personal preferences such as language, homepage or CRM settings. Changes made will only affect your user. To change preferences, click on the profile picture in the top right corner and go to Profile and preferences..png?width=300&height=172&name=update-profile-and-preferences%20(1).png) To change the profile picture, upload a new one from Upload image and adjust the size with the slider. To use a Gravatar photo, click on Use Gravatar. If the photo does not exist yet, go to Configure Gravatar photo.
To change the profile picture, upload a new one from Upload image and adjust the size with the slider. To use a Gravatar photo, click on Use Gravatar. If the photo does not exist yet, go to Configure Gravatar photo.
The date format and language can be changed by going to Language from the drop-down menu. Changing the language will automatically update the date format and number.
5. Receive help and training
From the bottom right hand corner of the screen you will find the Help button. From here you have access to the following elements:
- Knowledge Base: This is a library of articles and guides on specific products, with links recommended by other users, and allows you to interact with the community.
- Technical Support: This consists of a series of links to join the HubSpot community. You can access discussion topics with other users and communicate with the technical support team.
- HubSpot Academy: This is the learning centre of the platform, with different courses on Inbound Marketing and Sales to boost your professional career.
6. Choose your subscription plan
The HubSpot subscription is managed from the Account and Billing section of the main menu. The user must have the permissions to Modify billing and change contract name. From the Manage subscription tab, the payment quotas for the Sales Hub or Service Hub subscriptions are chosen. A payment method can be added by accessing the Payment Methods tab and enabling permission for all administrators to use it. 7. Connect another CRM with HubSpot
If your company has contacts or records in another CRM it is advisable to connect that account with the HubSpot account. From the main navigation bar you must access the marketplace icon, find the external application and click on it. After checking if your details are compatible with HubSpot and obtaining a subscription plan access the Shared Data section to synchronise the data from both accounts.