Add a pop-up form on your website thanks to HubSpot's free software
Getting new contacts interested in your brand is essential in an inbound marketing strategy. Remember that, thanks to the conversion funnel, those users who decide to register on your website and offer their data can sooner or later become customers. To do this, the job of the marketing team is to interact with the buyer personas that arrive on the web offering them own quality content when they may need it. And this is where pop-up forms come into play.
A pop-up form allows users to sign up for a newsletter or download a document in exchange for their data (or, at least, their email address). HubSpot includes this tool as part of its free software. Therefore, from OCCAM we want to make the process of creating a pop-up form easier for you by explaining all the steps you need to follow. Let's start!
First steps
- from the HubSpot homepage when you log in, click on the "Marketing" tab in the top bar.
- at the bottom of the drop-down, select the "Lead capture" option and then "Forms".
- once on this page, click on the "Create form" button at the top right.
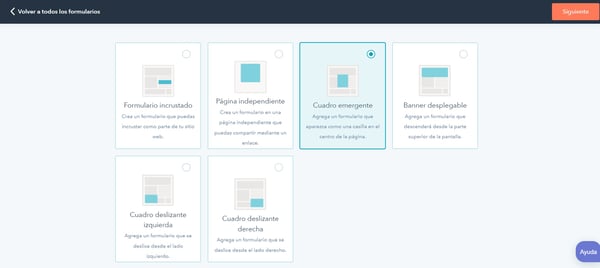
Choose a pop-up form type
The first step in creating a pop-up form is to choose the most appropriate type for your strategy. Among the options HubSpot offers in this step, there are some forms that cannot be considered pop-up, such as the embedded form and the standalone page. Therefore, you should choose one of these four types:
- pop-up box: When users are browsing your website, they will see a pop-up in the middle of the page.
- pop-up banner: Appears at the top of the screen and scrolls down from there.
- left slider box- slides in from the left side of the screen.
- right slider box. Same as above, but located on the right side of the page.
Choose one, select it and click on the "Next" button at the top right.
Customise your pop-up form
Now it's time to customise the form from scratch. You can check how all the changes you make look on the right side of your screen. You can also do this in the "Preview" tab , which offers a preview for desktop, tablet or mobile. Also, here you can test if the form works and complies with all the settings you made.
The following steps will be divided according to the tabs offered in the top bar, as each one includes its own settings. In this sense, the elements in bold are mandatory fields, while the underlined ones are optional.
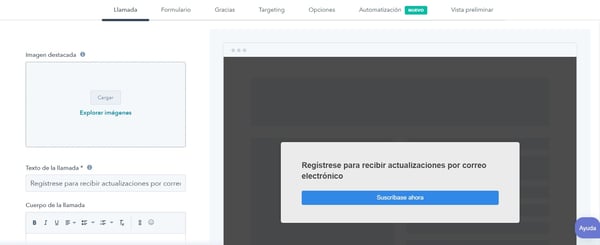
Design a call
Before filling in the form, a pop-up callout will appear, inviting users to register in an attractive way. To configure it, go to the "Callout" tab and fill in the following settings:
- featured image: You can include a visual resource to draw attention directly to the form by creating an eye-catching and simple design that informs about the benefits the user will get by registering.
- call text: HubSpot includes a default phrase, but modify it to suit your brand.
- call body: It is very useful to add a description or explanation of the content that the user will receive or the periodicity of the sending, although its inclusion is optional.
- text of the call button. Edit the content of the button that users will have to click to register. Use a word that invites to action without seeming like you are imposing something on them. You can use exclamation marks if you consider it appropriate.
- theme colour: To unify the form with your brand identity and design, use your colour palette and change the default blue provided by HubSpot.
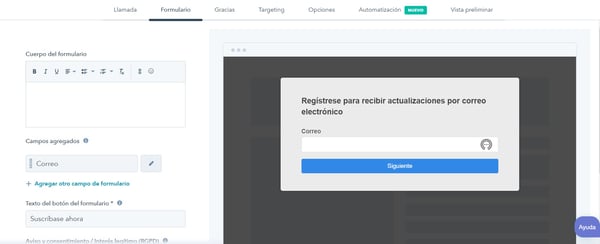
Set up the form
For all those users who have decided to sign up, the next step is to design the "Form" tab.
- form body: This is the same as the call body, but with different information or text.
- added fields: The email is the only mandatory field, the rest you can include as you wish. Some of them are: name, surname, phone number, time zone, brand name, etc. To edit them, click on the pencil icon. Ask only for the information that is essential for your marketing strategy, as some users might reject a form that is too long.
- form button text: This can be the same or different from the text of the call button, for example, if you put "Subscribe!" before, you could now put "Submit data".
- notice and consent / Legitimate interest (RGPD): This is about offering consent boxes regarding privacy laws and regulations. They are a guarantee of security and offer confidence to users. To include it, you need to have it previously configured in your HubSpot account.
- language: Choose the language of the form.
- cAPTCHA. It is a resource to prevent spam and fraudulent registrations.
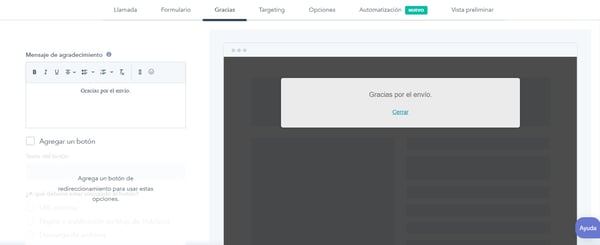
Write the thank you message
Once users have signed up, it's time to thank them for trusting your brand by setting up the "Thank you" tab:
- thank you message. Edit the text to make it as personal and sincere as possible.
- add a button: You can include a call-to-action button that guides the user to the next step within your brand. This can lead to an external link, a page on your blog or a download, among other options.
Decide which pages the pop-up form will appear on
Once the form itself has been customised, the more technical settings come next. Let's start with the "Targeting" tab , which is responsible for placing it on the pages of your website that you decide:
- website URL: Select the web pages where you want the pop-up form to appear.
- visitor information and behaviour: With these specifications, you can decide which users and at what point in their journey through the website the form will pop up. For example, you can differentiate between your existing contacts and new visitors.
Consider these other options
The "Options" tab offers other useful tools that you should consider:
- schedule: This allows you to publish the form on the day and at the time of your choice, so it will only be available from the exact moment you decide.
- customise the lifecycle stage according to submissions. Here you can choose in which stage you want to place all users who sign up to the form.
- small screen sizes: HubSpot gives you the option to disable the form for mobile devices with screens that are too small. This is useful if you haven't configured it for this type of device or if it includes too much text.
- show unsubscribed pop-up form: You can select how long you want to wait between a user unsubscribing and the form appearing again. The options are: one day, three days, one week, two weeks, or one month.
- send notifications: Every time a user registers, you can receive an email notification to all the email addresses you choose, or you can leave this box blank so that you don't receive any notifications at all.
that's it, the next step is to keep creating quality content so that your leads access the blog and decide to sign up on the pop-up form. Use their details strategically to take your contacts through the whole buyer's journey and turn them into customers.